
You are using an out of date browser. It may not display this or other websites correctly.
You should upgrade or use an alternative browser.
You should upgrade or use an alternative browser.
DIY hardwood floors
- Thread starter vollygirl
- Start date
thehardknoxlife
Well-Known Member
- Joined
- Dec 2, 2008
- Messages
- 2,318
- Likes
- 1,268
Staples.
Rent one of these. http://www.uptownfloors.com/images/mallet-solid-hardwood.jpg and these https://encrypted-tbn0.gstatic.com/...T_aHe8yWwF24AtkWyVsQ_luuGZf2ryIr_2I8mXYVbwYtF.
Make sure each staple sinks all the way into the wood otherwise the next piece you install over it will create a bubble where the staple is, this might not happen depending on the wood type but is a common practice. Make sure to screw your existing floor down wherever you find a squeak. After that, lay tar paper on top of the old floor to prevent any squeaks between the new floor and old floor.
- Joined
- Sep 27, 2008
- Messages
- 68,837
- Likes
- 62,065
Staples.
Rent one of these. http://www.uptownfloors.com/images/mallet-solid-hardwood.jpg and these https://encrypted-tbn0.gstatic.com/...T_aHe8yWwF24AtkWyVsQ_luuGZf2ryIr_2I8mXYVbwYtF.
Make sure each staple sinks all the way into the wood otherwise the next piece you install over it will create a bubble where the staple is, this might not happen depending on the wood type but is a common practice. Make sure to screw your existing floor down wherever you find a squeak. After that, lay tar paper on top of the old floor to prevent any squeaks between the new floor and old floor.
Thanks!
apevol
KDKWKDJDKAJFBAJFJW D JAKFJSJSHF
- Joined
- Dec 23, 2012
- Messages
- 27,337
- Likes
- 22,860
- Joined
- Sep 27, 2008
- Messages
- 68,837
- Likes
- 62,065
marcusluvsvols
Blue collar skoller
- Joined
- Jan 7, 2012
- Messages
- 18,331
- Likes
- 34,192
I have laid at least 100,000 square feet with the staple gun above. Rent one , should come with a rubber mallet used to Tap the boards in place and strike the staple gun.
You will also need a finish gun, normal 16 gauge with 2 inch finish nails for strating out and the last 3 rows when you come up to the wall at the opposite end of the room from where you start. The staple gun won't fit between the hardwood and the wall, so you have to tap the boards into place, use a pry bar to get then tight, then nail them in place. The 3rd row from the wall can be nailed at a 45 degree angle thru the tongue. The last 2 will have to be face nailed through the top of the wood and the nail holes filled. I recommend min wax color match putty from lowes.
Tools needed besides guns and compressor:
Jig saw or Sawzall if vent registers in floor.
Chop saw or circular for last board on each row.
Table saw or circular for "rip" on last row at the end of the room that is face nailed.
Pry bar (flat, like wonder bar )
Speed square, tape measure, pencil, chalk line, etc. Hand tools.
This job isn't nearly as hard as this post sounds. If you guys are handy and do general carpentry around the house it shouldn't be a problem. Let me know if I can help, I am in the politics forum daily.
- Joined
- Sep 27, 2008
- Messages
- 68,837
- Likes
- 62,065
I have laid at least 100,000 square feet with the staple gun above. Rent one , should come with a rubber mallet used to Tap the boards in place and strike the staple gun.
You will also need a finish gun, normal 16 gauge with 2 inch finish nails for strating out and the last 3 rows when you come up to the wall at the opposite end of the room from where you start. The staple gun won't fit between the hardwood and the wall, so you have to tap the boards into place, use a pry bar to get then tight, then nail them in place. The 3rd row from the wall can be nailed at a 45 degree angle thru the tongue. The last 2 will have to be face nailed through the top of the wood and the nail holes filled. I recommend min wax color match putty from lowes.
Tools needed besides guns and compressor:
Jig saw or Sawzall if vent registers in floor.
Chop saw or circular for last board on each row.
Table saw or circular for "rip" on last row at the end of the room that is face nailed.
Pry bar (flat, like wonder bar )
Speed square, tape measure, pencil, chalk line, etc. Hand tools.
This job isn't nearly as hard as this post sounds. If you guys are handy and do general carpentry around the house it shouldn't be a problem. Let me know if I can help, I am in the politics forum daily.
You rock! Thanks!!
FLVOL_79
GS-17 Classified
- Joined
- Feb 12, 2011
- Messages
- 50,868
- Likes
- 73,961
I floated mine but its on a concrete slab here in Florida and it was engineered bamboo (looks awesome). I had to remove the tile from my house then grind the floors smooth with a concrete grinder which made the list of top 5 worst things I've ever had to do in my life. After that though it was just laying down some underlayment and staggering the joints as I laid the boards down.
Marcus is on the money with the tools you need but make sure you have new saw blades because they will be worn by the time you are done! I would also recommend some sort of dremel with a flush wood cutting blade. It makes it a lot easier when working around door jambs. I also used a dead blow hammer to gently tap boards together to get them tight.
Marcus is on the money with the tools you need but make sure you have new saw blades because they will be worn by the time you are done! I would also recommend some sort of dremel with a flush wood cutting blade. It makes it a lot easier when working around door jambs. I also used a dead blow hammer to gently tap boards together to get them tight.
wildnkrazykat
Well-Known Member
- Joined
- Jul 10, 2010
- Messages
- 47,351
- Likes
- 926
crusse10
THIS MAN IS A PERVERT
- Joined
- Apr 28, 2008
- Messages
- 21,338
- Likes
- 2,818
I have laid at least 100,000 square feet with the staple gun above. Rent one , should come with a rubber mallet used to Tap the boards in place and strike the staple gun.
You will also need a finish gun, normal 16 gauge with 2 inch finish nails for strating out and the last 3 rows when you come up to the wall at the opposite end of the room from where you start. The staple gun won't fit between the hardwood and the wall, so you have to tap the boards into place, use a pry bar to get then tight, then nail them in place. The 3rd row from the wall can be nailed at a 45 degree angle thru the tongue. The last 2 will have to be face nailed through the top of the wood and the nail holes filled. I recommend min wax color match putty from lowes.
Tools needed besides guns and compressor:
Jig saw or Sawzall if vent registers in floor.
Chop saw or circular for last board on each row.
Table saw or circular for "rip" on last row at the end of the room that is face nailed.
Pry bar (flat, like wonder bar )
Speed square, tape measure, pencil, chalk line, etc. Hand tools.
This job isn't nearly as hard as this post sounds. If you guys are handy and do general carpentry around the house it shouldn't be a problem. Let me know if I can help, I am in the politics forum daily.
so a wonder bar is flat, but a wonderbra is
marcusluvsvols
Blue collar skoller
- Joined
- Jan 7, 2012
- Messages
- 18,331
- Likes
- 34,192
I floated mine but its on a concrete slab here in Florida and it was engineered bamboo (looks awesome). I had to remove the tile from my house then grind the floors smooth with a concrete grinder which made the list of top 5 worst things I've ever had to do in my life. After that though it was just laying down some underlayment and staggering the joints as I laid the boards down.
Marcus is on the money with the tools you need but make sure you have new saw blades because they will be worn by the time you are done! I would also recommend some sort of dremel with a flush wood cutting blade. It makes it a lot easier when working around door jambs. I also used a dead blow hammer to gently tap boards together to get them tight.
I love that bamboo. Extremely durable, I tell people to get it over any other floater.
New saw blades are important.
When you come to door jambs, used to have to cut them with a hand saw and finish with a chisel. Not any more...any oscillating saw will do the trick,Dremel. And others make them.
Take a piece of black felt paper underlayment and double it up, lay a scrap piece of the flooring,or a new piece upside down on top of the felt and push it up against the doorjamb. Put the blade of the ascillator on top of the board and make perfect cuts every time.
Edit. 90 perecent of the time you can tell a floor was put in by homeowners instead of professionals by the way it goes around doorjambs,stairs ,etc. Instead of going underneath them like it's supposed to. Where a floor meets baseboards, it can butt.into them because you put down shoe mould to cover it. You can t run shoe around door jambs. They need to be cut. If you have rounded stairs aND cutting them isn't practical, you can buy rubber shoe mould that is flexible. It comes in a roll and loOKs just like regular shoe. Hope this helps.
Last edited:
- Joined
- Sep 27, 2008
- Messages
- 68,837
- Likes
- 62,065
Bamboo is gorgeous! It made my top three, but I ended up going with oak.
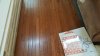
This is the room we're doing (the bottom picture on my screen-not sure how it'll show up when I actually post), and the only thing we'll have to deal with (other than the "square" walls) will be the flat hearth insert (whatever you call that). It's cracked and has to be replaced too. Which I guess we'll do after we get the ugly seafoam green carpet up. Can you appreciate from this photo how ugly that carpet is? Apparently in '91 seafoam green carpet and pink counter tops were popular. blech!!! I suppose I'll look for the same color slab of marble or whatever it is you use.
I didn't want the same color wood (not that I'd ever be able to match it since it's 25 years old), so I picked a darker shade, it's a wider board, and will run in the opposite direction. Not sure what piece of transition will look best. Thoughts on that?
Attachments

KoachKletus
Kleat Taughtener
- Joined
- Feb 1, 2011
- Messages
- 4,844
- Likes
- 776
Bamboo is gorgeous! It made my top three, but I ended up going with oak.
This is the room we're doing (the bottom picture on my screen-not sure how it'll show up when I actually post), and the only thing we'll have to deal with (other than the "square" walls) will be the flat hearth insert (whatever you call that). It's cracked and has to be replaced too. Which I guess we'll do after we get the ugly seafoam green carpet up. Can you appreciate from this photo how ugly that carpet is? Apparently in '91 seafoam green carpet and pink counter tops were popular. blech!!! I suppose I'll look for the same color slab of marble or whatever it is you use.
I didn't want the same color wood (not that I'd ever be able to match it since it's 25 years old), so I picked a darker shade, it's a wider board, and will run in the opposite direction. Not sure what piece of transition will look best. Thoughts on that?
An old friend once said, "The seafoam green carpet brings the room together".
")
- Joined
- Jul 12, 2012
- Messages
- 37,766
- Likes
- 15,697
FLVOL_79
GS-17 Classified
- Joined
- Feb 12, 2011
- Messages
- 50,868
- Likes
- 73,961
I've seen what you describe in regards to the door jambs. When I did my floor I had a flush hand saw and a dremel multi tool thing with a flush wood blade. I removed the trim around the doors (and replaced) but cut the door jambs and fit the boards underneath. I in no way can claim to be a pro but I think I did a pretty good job for a dyi'er.I love that bamboo. Extremely durable, I tell people to get it over any other floater.
New saw blades are important.
When you come to door jambs, used to have to cut them with a hand saw and finish with a chisel. Not any more...any oscillating saw will do the trick,Dremel. And others make them.
Take a piece of black felt paper underlayment and double it up, lay a scrap piece of the flooring,or a new piece upside down on top of the felt and push it up against the doorjamb. Put the blade of the ascillator on top of the board and make perfect cuts every time.
Edit. 90 perecent of the time you can tell a floor was put in by homeowners instead of professionals by the way it goes around doorjambs,stairs ,etc. Instead of going underneath them like it's supposed to. Where a floor meets baseboards, it can butt.into them because you put down shoe mould to cover it. You can t run shoe around door jambs. They need to be cut. If you have rounded stairs aND cutting them isn't practical, you can buy rubber shoe mould that is flexible. It comes in a roll and loOKs just like regular shoe. Hope this helps.
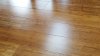
Below is a shot of my bamboo floor.
Attachments
Advertisement