DIY hardwood floors

#26
#26
Bamboo is gorgeous! It made my top three, but I ended up going with oak.

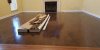
This is the room we're doing (the bottom picture on my screen-not sure how it'll show up when I actually post), and the only thing we'll have to deal with (other than the "square" walls) will be the flat hearth insert (whatever you call that). It's cracked and has to be replaced too. Which I guess we'll do after we get the ugly seafoam green carpet up. Can you appreciate from this photo how ugly that carpet is? Apparently in '91 seafoam green carpet and pink counter tops were popular. blech!!! I suppose I'll look for the same color slab of marble or whatever it is you use.

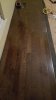
I didn't want the same color wood (not that I'd ever be able to match it since it's 25 years old), so I picked a darker shade, it's a wider board, and will run in the opposite direction. Not sure what piece of transition will look best. Thoughts on that?

You just need a piece of oak reducer where that floor ends. Looks like what you picked out is 3/4" pre finished red oak. If they don't have a reducer prefinished to match where you bought the flooring, you can buy an unfinished piece and easily stain and polyurethane it. I prefer the min wax products for both. Semi gloss polyurethane in a spray can will do the trick with 3 or 4 light coats. Cut the reducer to length, hand sand with 100 grit sandpaper or similar, stain with an old sock or rag from a small sample size can (looks like provincial or early American color would match) then wipe off the excess stain. Let dry for 15 mins. And begin applying coats of poly with maybe 10 mins. Dry time in between on a hot sunny day.

Looks like your project is straight forward. I don't think you guys will have any trouble. Hope This helps.
 
#27
#27
You just need a piece of oak reducer where that floor ends. Looks like what you picked out is 3/4" pre finished red oak. If they don't have a reducer prefinished to match where you bought the flooring, you can buy an unfinished piece and easily stain and polyurethane it. I prefer the min wax products for both. Semi gloss polyurethane in a spray can will do the trick with 3 or 4 light coats. Cut the reducer to length, hand sand with 100 grit sandpaper or similar, stain with an old sock or rag from a small sample size can (looks like provincial or early American color would match) then wipe off the excess stain. Let dry for 15 mins. And begin applying coats of poly with maybe 10 mins. Dry time in between on a hot sunny day.

Looks like your project is straight forward. I don't think you guys will have any trouble. Hope This helps.

Thanks!
 
#28
#28
You rock! Thanks!!

I've laid tons of it too and agree with Marcus 100%, but let me add that a door jamb saw is also helpful to slide your board under the door jamb. Need clean tight fit under the door jambs look great.
 
#29
#29
We finally got started on the actual floor. We've laid about 20% of it so far. The delay we ran into was replacing the hearth (the existing marble slab was cracked.) We couldn't source a 3/4 inch piece of marble or granite locally (didn't want to buy a kit and remove the marble surround), so I eventually decided on a granite tile in a color that will work with the existing marble and the new floor. Future homeowners might not like it, but that'll be our kids' problem. :) (The hearth pic is from laying the tile down and putting the flooring next to it....to make positive I like it before it's permanent. There will be a trim piece between the tile and wood, and we spaced the tile 1/8" with black grout.) We also decided not to do a transition piece between the existing floor and the new floor. They line up beautifully, and it's pleasing to my eye.

I am loving the floor so far. I hate that we waited this long to do it but we aren't rich, and wood ain't cheap. So far we've only had to pull one staple out, and that was my bad. And I'll say this....if you're a person who struggles with OCD tendencies, this process is really therapeutic. We would probably be further along if I let hubby pick the next board. :lol:

Thanks to everybody for your input!
 

Attachments

  • hearth tile.jpg
    hearth tile.jpg
    43.9 KB · Views: 0
  • flooring.jpg
    flooring.jpg
    22.7 KB · Views: 2
  • Like
Reactions: 2 people
#30
#30
These last few rows are going to take a while, but it's almost done. The wood is GORGEOUS! I love this color so much! And my husband is a saint. He comes home from work and starts working on this floor. We haven't had a single stretch of open time since we started, every weekend day has been taken up with something, and he just comes home and plugs away at it.

This will be my last post about the floor. Just wanted to give a shout out to my hubby. :)
 

Attachments

  • floorboutdone.jpg
    floorboutdone.jpg
    44.1 KB · Views: 12
  • Like
Reactions: 2 people
#32
#32
I love dark hardwood! We were lucky enough to buy a home that had it all downstairs. Yours is looking great!
 
#34
#34
We finally got started on the actual floor. We've laid about 20% of it so far. The delay we ran into was replacing the hearth (the existing marble slab was cracked.) We couldn't source a 3/4 inch piece of marble or granite locally (didn't want to buy a kit and remove the marble surround), so I eventually decided on a granite tile in a color that will work with the existing marble and the new floor. Future homeowners might not like it, but that'll be our kids' problem. :) (The hearth pic is from laying the tile down and putting the flooring next to it....to make positive I like it before it's permanent. There will be a trim piece between the tile and wood, and we spaced the tile 1/8" with black grout.) We also decided not to do a transition piece between the existing floor and the new floor. They line up beautifully, and it's pleasing to my eye.

I am loving the floor so far. I hate that we waited this long to do it but we aren't rich, and wood ain't cheap. So far we've only had to pull one staple out, and that was my bad. And I'll say this....if you're a person who struggles with OCD tendencies, this process is really therapeutic. We would probably be further along if I let hubby pick the next board. :lol:

Thanks to everybody for your input!

FYI if you grouted the joint between the tile and the wood it may crack over time due to the wood expanding and moving independently from the tile. I'd recommend getting a caulk that matches the grout (the grout manufacturer should make one) and either removing the grout and replacing it with caulk or just holding onto it until it cracks and filling the crack.
 
#35
#35
FYI if you grouted the joint between the tile and the wood it may crack over time due to the wood expanding and moving independently from the tile. I'd recommend getting a caulk that matches the grout (the grout manufacturer should make one) and either removing the grout and replacing it with caulk or just holding onto it until it cracks and filling the crack.

We haven't done the grout yet. We will only be doing the interior part (I think). And using hardwood T molding around the exterior.
 
#36
#36
We haven't done the grout yet. We will only be doing the interior part (I think). And using hardwood T molding around the exterior.

Ah I gotcha. Nevermind then. I actually misread your earlier post and thought you said you weren't using a transition piece between the hardwood and the tile.

The hardwood looks great btw!
 
#37
#37
Ah I gotcha. Nevermind then. I actually misread your earlier post and thought you said you weren't using a transition piece between the hardwood and the tile.

The hardwood looks great btw!

Thanks! I'm really happy we did it.
 
#38
#38
I lied when I said last post earlier. :) Finally done. Can't wait to get the furniture back in the room! Still trying to figure out where we're gonna store the one un-opened box of wood. :lol:
 

Attachments

  • floordone.jpg
    floordone.jpg
    32.2 KB · Views: 3
#39
#39
I lied when I said last post earlier. :) Finally done. Can't wait to get the furniture back in the room! Still trying to figure out where we're gonna store the one un-opened box of wood. :lol:

Stand it in the corner of a closet. If you ever need it, it will be acclimated and easily found.

Beautiful floors btw.
 

VN Store


Back
Top