Things I Have Built

The hardest physical part of building an engine is installing the valves properly. Other than that make sure you've got the timing aspect of the engine set up properly.

On a rebuild, I'd hone the cylinders and use new piston rings that fit properly. Additionally it's probably good to get the head and manifold machined to ensure a good fit and no leaks.

I've got an old Kohler 321 off a Wheelhorse tractor that I've taken apart. It seems that you have to have some kind of tool to align two balance gears so they are in time. Seems complicated to me so that's where I'm at on that project.
 
I've got an old Kohler 321 off a Wheelhorse tractor that I've taken apart. It seems that you have to have some kind of tool to align two balance gears so they are in time. Seems complicated to me so that's where I'm at on that project.

Honestly, it's been 45 years since I built one of those or one very similar. Built tons of Kohler engines. I don't remember it being complicated on the timing. I vaguely remember markings on the gears that helped with proper timing. Once you have the valves, piston and crankshaft in place, they should rotate freely and should be able to verify that the valves are opening and closing at the proper times.
 
Built this Charleston Triple Chest in African Mahogany over the summer. This is my first project that used ogee feet and sliding dovetails. The casework is all half blind dovetails. Best I can count this project has 244 hand cut dovetails. The finish is dye, thin coat of boiled linseed oil and padded shellac.
 

Attachments

  • DSC_2302resized.jpg
    DSC_2302resized.jpg
    427.1 KB · Views: 40
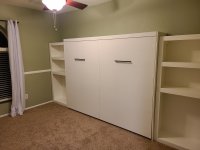
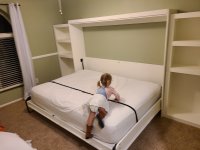
He made it from a kit but it was still a ton of work, especially with the extra stuff we added. The hydraulics are so nice. My mother-in-law can lower the bed with one hand.
Could an adult sleep on it comfortably?
 
These things are great for spare rooms, with maybe a pair of lightweight easy chairs in front of it when it’s up.
 
@SDV Posted a pic of his daughter years ago with no shoes on. Got a bunch of e-grief about it.

My kid suddenly has a no pants, jacket, or shoes policy that she is pretty firm on. We can get her to wear dresses and those boots. I just got her light up sneakers that she tolerates so far.
 
  • Like
Reactions: SDV
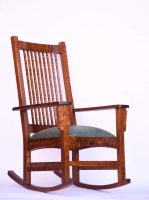
My daughter wanted a rocking chair and since I have never made a chair before I was interested in giving it a try. the wood is curly maple. It was dyed with dark mahogany, sanded, dyed with antique maple and finished with shellac. My first attempt at upholstery, too.
DE1307D8-071B-40C6-8BD2-1E0602ADB351.jpeg
 

Attachments

  • 37FC7A19-00A5-458A-9341-5C8CA060EE22.jpeg
    37FC7A19-00A5-458A-9341-5C8CA060EE22.jpeg
    108 KB · Views: 30
Can anybody recommend an epoxy resin that's not too runny to seal the edge of plywood? I make plywood yard decorations and this Christmas I had a couple that got water in the edges and caused some damage. Plywood is so crappy these days - there are voids on the edges when you cut out the pattern. I filled all I could find with wood filler then used 3 coats of oil primer and then 2 coats of paint and a couple of them still got water in and swelled up. I guess I could have added a couple coats of spar urethane but thought 5 coats of primer and paint should be enough. I made this Max pictured below and used 3 coats of Titebond 3 to seal the edge before the primer and paint and then added 2 coats of spar urethane. I'll see how that holds up. I've tried the penetrating epoxies and they help but they are too runny for a vertical surface so not enough soaks in. I lay these across 2 sawhorses to seal the edges and I need something that won't run off. I've also tried some of the thicker quick set epoxies and they're thick and don't run but they have such a short working time I have to mix up 3 batches to do 1 project.

P1020524.JPG
 
Can anybody recommend an epoxy resin that's not too runny to seal the edge of plywood? I make plywood yard decorations and this Christmas I had a couple that got water in the edges and caused some damage. Plywood is so crappy these days - there are voids on the edges when you cut out the pattern. I filled all I could find with wood filler then used 3 coats of oil primer and then 2 coats of paint and a couple of them still got water in and swelled up. I guess I could have added a couple coats of spar urethane but thought 5 coats of primer and paint should be enough. I made this Max pictured below and used 3 coats of Titebond 3 to seal the edge before the primer and paint and then added 2 coats of spar urethane. I'll see how that holds up. I've tried the penetrating epoxies and they help but they are too runny for a vertical surface so not enough soaks in. I lay these across 2 sawhorses to seal the edges and I need something that won't run off. I've also tried some of the thicker quick set epoxies and they're thick and don't run but they have such a short working time I have to mix up 3 batches to do 1 project.

View attachment 345041
I might try a simple plastic edging glued and tacked on - like you might see in a bathroom - then paint it the color you want
Something like this:
ACD995B3-191B-4C94-9073-C8A1A729D77E.jpegACD995B3-191B-4C94-9073-C8A1A729D77E.jpeg
 
My daughter wanted a rocking chair and since I have never made a chair before I was interested in giving it a try. the wood is curly maple. It was dyed with dark mahogany, sanded, dyed with antique maple and finished with shellac. My first attempt at upholstery, too.
View attachment 343880
Holy crap that is phenomenal
Is this one of those projects that you will never do again?
 
My daughter wanted a rocking chair and since I have never made a chair before I was interested in giving it a try. the wood is curly maple. It was dyed with dark mahogany, sanded, dyed with antique maple and finished with shellac. My first attempt at upholstery, too.
View attachment 343880
That looks great, interested in what kind of joinery you used. Dowels and glue, pocket screws, ?
 
Hi utchs81. It is all mortise and tenon. All mortises were hand cut with a chisel (I have a mortising machine, but the bit would not handle the maple) There are two hidden screws through the back and into the arms which I plugged with walnut. Also, the rockers have mortises that fit into tenons on the legs, but to make it easier to move they are not glued on but fitted with screws. So 6 screws total. All of the rest are glue joints.
 
Hi and thanks, Nono. I will build another because I started making two, but along the way decided to finish one following the video I followed, a Paul Sellers video. I think I will refine the next one to have more graceful curves, different shaped rocker, ect... but overall have essentially the same overall measurements. I guess from start to finish I spent two months on this one, but I still have a real job and only work when I feel like it. I dont really know how much time I spent on this
 
  • Like
Reactions: MWR and VolNExile
Hi utchs81. It is all mortise and tenon. All mortises were hand cut with a chisel (I have a mortising machine, but the bit would not handle the maple) There are two hidden screws through the back and into the arms which I plugged with walnut. Also, the rockers have mortises that fit into tenons on the legs, but to make it easier to move they are not glued on but fitted with screws. So 6 screws total. All of the rest are glue joints.
Color me Orange and Impressed.
 

VN Store


Back
Top